TIREFIT kit version 1
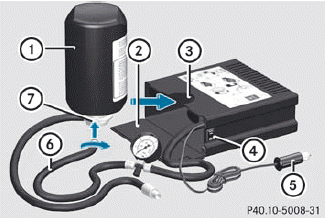
► Open flap 2.
► Pull connector 5 with the cable and hose
6 out of the housing.
► Screw hose 6 onto flange 7 of tire
sealant bottle 1.
► Insert tire sealant bottle : head
downwards into recess 3 of the tire
inflation compressor.

► Remove the cap from valve 9 on the faulty tire.

► Make sure pressure release screw 10 on
pressure gauge 11 is fully closed.
► Screw filler hose 8 onto valve 9.
► Insert connector 5 into the socket in the
footwell of the second row of seats.
![]() None of the other sockets or cigarette
lighters are designed for operating the tire
inflation compressor.
None of the other sockets or cigarette
lighters are designed for operating the tire
inflation compressor.
► Turn the SmartKey to position
1() in the ignition lock.
► Press on/off switch ? on the tire
inflation
compressor to I.
The tire inflation compressor is switched on. The tire is inflated.
 First, TIREFIT is pumped into the tire. The
pressure can briefly rise to approximately
500 kPa (5 bar/73 psi).
First, TIREFIT is pumped into the tire. The
pressure can briefly rise to approximately
500 kPa (5 bar/73 psi).
Do not switch off the tire inflation compressor during this phase.
► Allow the tire inflation compressor to run for five minutes. The tire should then have attained a pressure of at least 180 kPa (1.8 bar/26 psi).
![]() Do not operate the tire inflation
compressor for longer than eight minutes
at a time without a break. It may otherwise
overheat.
Do not operate the tire inflation
compressor for longer than eight minutes
at a time without a break. It may otherwise
overheat.
The tire inflation compressor can be operated again once it has cooled down.
If a pressure of 180 kPa (1.8 bar/26 psi) has been achieved after five minutes, see.
If a pressure of 180 kPa (1.8 bar/26 psi) has not been achieved after five minutes, see.
See also:
The model range: Every CLS is a one-off
Individuality is written large in the new Mercedes CLS. The model range for
the four-door Coupé is correspondingly extensive - it will be at first be
available with rear-wheel drive and the ...
Defrosting the windshield
You can use this function to defrost the
windshield or to defrost the inside of the
windshield and the side windows.
You should only select the defrosting
function until the windshield is clear ...
2011 Mercedes-Benz CL-Class Review
The 2011 Mercedes-Benz CL550 is stunning — both to look at and to drive — in
a way not many cars are.
The CL550 is plenty quick, though it's not at the top of the CL-Class heap in
terms of power ...